Quantcast
Channel: Northwest Edible Life

Reader Questions: February

$
0
0

I can’t let February sneak past without doing a reader question post. This month: fermentation lids, peppers that will ripen in the Northwest, litter for chicken coops and more.

We also have Community Questions asking for suggestions, advice or resources for gardening in Central America and Florida. I’m not knowledgeable enough to answer, but maybe you can help?

ReaderQuestions

Do I Need To Use A Crock Cover For Fermentation?

What is the purpose of the crock covers I see marketed and what benefit would they offer me?

I’ve been making 5 gallon batches of kraut and pickles for a few months now.  I typically leave the crock in the basement while it ferments and every day or three I skim off the scum (yeast as I understand it).  I cover my crocks with a towel as they are going to keep out any dust/young children.

Clinton

So just for folks who aren’t sure what Clinton’s talking about, we don’t mean the inner weight you’d use to keep your fermenting vegetables submerged. We’re talking here about an outer cover designed to keep dust and contaminants out of your ferment.

The classic, straight-sided stonewear crocks without a water moat like these are often sold without a cover. But if you want a lid, you can buy one as an accessory. Here’s a picture:

Crock-with-lid


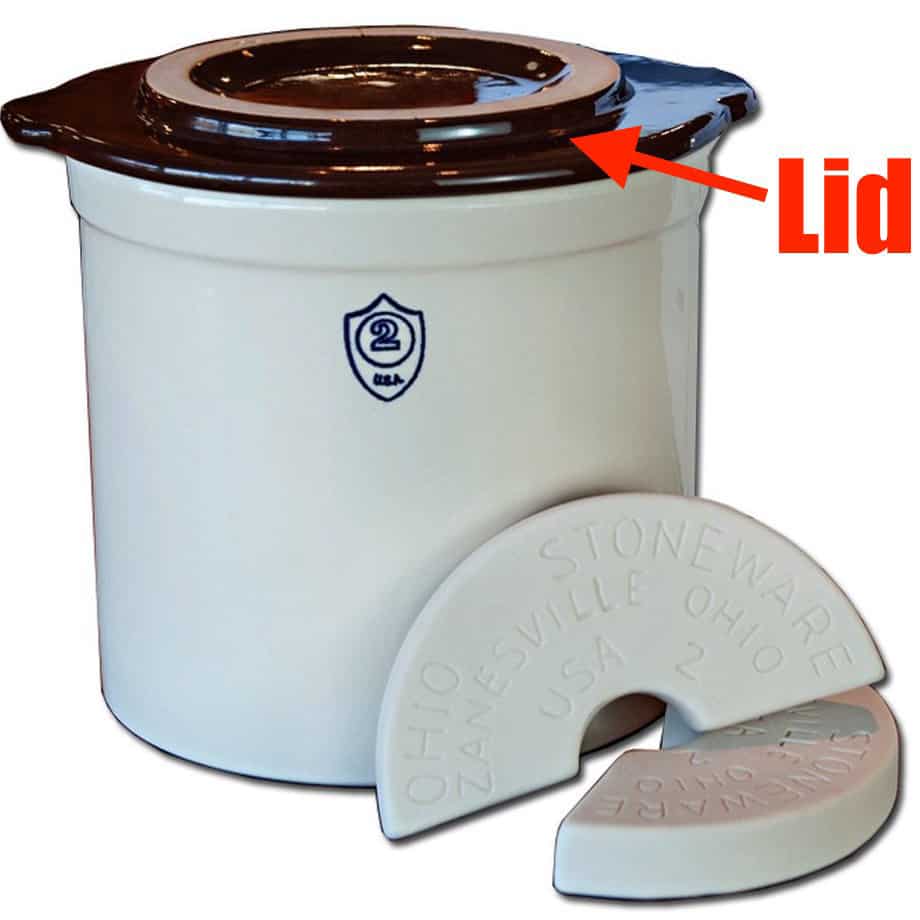
These lids for straight-sided crocks are totally optional. They aren’t going to make the difference between a failed and a successful ferment. That said, they do offer some advantages.

  • While not air tight, the covers will slow down oxygen exchange to your ferment as compared to a towel.
  • They are going to be more effective at keeping dust, airborne yeast, and similar contaminants off your ferment than a kitchen towel, simply because they aren’t porous like cloth, so you will need to remove scum from your ferments less often.
  • They are opaque, so light will not damage your ferment.
  • They are heavy, so they are unlikely to be blown, snagged, or accidentally knocked off your crock.
  • They promote temperature stability in your ferment by adding additional mass around your ferment.

So these covers are useful, but the truth is, any solid, earthenware plate with a lead-free, food-safe glaze of an appropriate size would provide similar advantages. Traditionally, lots of folks made wooden lids to cover their crock.

You mentioned young kids. If you are keeping your crocks someplace where kids might get into them, it’s worth considering if a heavy and breakable lid is maybe not a better option than your towel – I’m just thinking of my son sliding something like a ceramic crock cover off and then dropping it right on his feet. Cause he would do something like that.

If kid safety isn’t an issue, you can use a heavy plate to test-run the utility of a heavy, opaque lid. If you find that cover cuts down on contamination and the amount of skimming in your particular situation, you might decide investing in the dedicated crock lid is worth it.

Sand Over Concrete Floors In A Chicken Coop?

I have a question regarding the floor of my coop.  We live on an old dairy farm and are converting the old “milking room” into a coop. It has concrete floors.  I had planned on covering the floor with straw until i read your blog on using sand.  Any thoughts or ideas? I’m hoping concrete won’t be a problem.

Thanks

Denise

I’ve been really happy with how clean sand had been in our coop, but I can’t imagine that sand would be a cleanliness advantage over straight concrete.

A search for “coop floor sand over concrete” brought me to this tale of coop sadness, from a woman who said her sand-over-concrete coop floor was a stinky mess any time it got wet. Her report enhanced my skepticism about sand over concrete.

Brilliant readers, anyone want to weigh in on this?

Chicken_On_Sand

In terms of non-sand options, I don’t know if you are thinking a deep-litter, compost-in-place type system, or just a layer of straw to give your hens a more comfortable grip as they walk. There are many advantages to a deep litter system, but to do it successfully the litter needs access to micro-organisms.

I’ve only ever done deep-litter over dirt, but I’m sure with a bit of patience and perhaps an inoculation of your litter with some good garden soil you could make it work over concrete. If just might require a bit more fiddling than it would over soil.  This is a good article on deep litter coop maintenance if you want to go that route.

In your situation, I’d honestly be excited to have a concrete floor ready to go in my coop. I think you’re gonna be really happy with it. I’d do some research to see if you want to seal the concrete in some way before it gets used as a coop, then for your birds I’d go with your original plan and lay down at least 4-6 inches of bedding over the concrete.

Straw is a fine litter as long as it stays dry. Wet straw is not nice. If you are rural, straw is very cost effective. Non-aromatic wood shavings or clean chips work well in my experience. I’ve also heard really good things about wood bedding pellets (like this) in coops. If you happen to live in an area where rice is grown, rice hulls are supposed to be great. (Hat tip to Root Simple for that tip.)

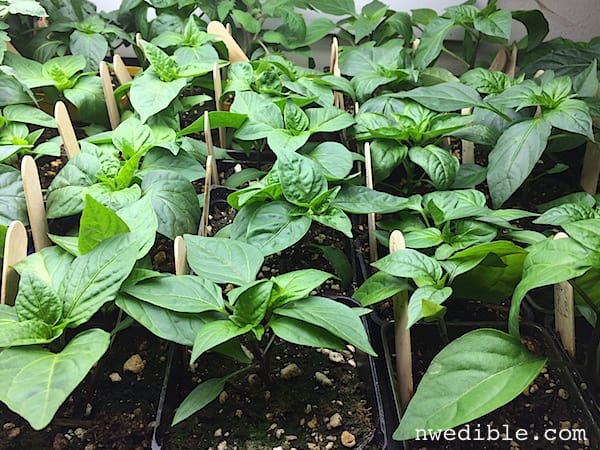
What Peppers Will Ripen In The Northwest?

I live in southwest British Columbia, close to the Pacific ocean, so we are blessed with a so-called Mediterranean climate, but we have summer fog all summer long, even when it is not visible. Two of my favorite vegetables, tomatoes and bell peppers, cannot be ripened outside, which is okay because I have a passive solar greenhouse.

But, bell peppers are still problematic (My tomatoes are beyond excellent, I have been told). I have not found a variety of pepper that matures and turns red early enough to harvest a reasonable quantity to get us through the winter – any suggestions? 

Mike

King of the North is my favorite red bell pepper for short season summers like ours. If you are ok with a sweet red pepper that’s not a bell-shape, try the Italian horn shaped peppers. Carmen is a great variety – reliable, sweet and thick-walled for a frying pepper. Gypsy used to be a favorite but I think it’s pretty much gone from seed catalogs now.

Just like cherry tomatoes ripen before beefsteaks, mini bells will ripen earlier than the full size peppers. The sweet baby bell peppers are probably worth experimenting with for your situation.

Pepper Seedlings

Convert A Crawl Space To A Root Cellar?

I live on very small piece of land in a 950 ft home. I’ve started to put up my veggies and have always made jams/jelly, Aigre-doux, etc. but that leads to my problem which is storing these goodies.

I have no basement or garage where I can keep things cool or have a second refrigerator.  My house sits on a two foot crawl space though and I have been considering digging out some of that crawl space to create a makeshift root cellar. 

Any creative ideas on how to go about this?

Karen

The amount you manage to grow in a small space is awesome. Well the first thing I want to clarify is that you don’t need a root cellar to store canned items like jams, pickles, etc. – jarred foods should keep fine at room temperature, though cool, dark storage helps preserve flavor and color longer.

If you are primarily looking for storage for your jars, any nook you can find or create in your home will do fine. I know space is at a premium but I feel like there must be easier ways to build-in additional storage as opposed to digging out a crawl space.

36313312_ml 2

Where the cool, even temps of an underground root cellar really help are with fresh storage crops like beets, carrots, onions, winter squash, etc. and living ferments like sauerkraut. So if you are growing a lot of storage crops, I think a test-run of the crawl space root cellar concept is a really neat idea.

What if you got a plastic laundry basket – something with some ventilation holes – that would fit in your crawl space as it is now? I’m thinking you might put a selection of items you’d want to store in the root cellar – squash, beets, etc. – as well as a few jarred items – in the laundry basket. Then store this away in the current crawl space and try to get a feeling for how this space already works.

In terms of the actual conversion of your crawl space, I found some info on converting crawl spaces into basements, and while I think you’re talking about a much smaller scale excavation, this does not seem like a DIY kind of project. The trick is removing some of the dirt under the house without removing any of the dirt that’s important for keeping the house up. I’m getting a real, “a structural engineer should sign off on this,” vibe. Sorry. 🙁

Community Questions! Can You Help?

I have two reader requests for information of a regional nature. Unfortunately, neither region is one I’ve much knowledge of.

We live in a tropical island environment in Central America.  I have searched for good tropical gardening reference books, bought a couple, but pretty much useless on much of the information. Anything you can recommend would be appreciated.

Cindy

and

If you have any info for Florida heirloom species, tips, insights, or thoughts, I would appreciate them. 

Marshall

For both Cindy and Marshall, I’d point them in the direction of Geoff Lawton’s permaculture work. His does a lot of  tropical and sub-tropical design. I’d definitely spend some time with Geoff’s stuff if you have questions about design or layout of your garden.

Kris from Attainable Sustainable (a great site if you don’t already follow it) homesteads in Hawaii – she might be in a similar enough climate to be helpful to you both.

I know Southern Exposure Seed Exchange has an amazing reputation for quality seeds that are well adapted to a Southern climate. I’d definitely point Marshall in that direction, and even Cindy might find SESE’s grow guides useful.

Other than that, I’m not familiar with many tropical/sub-tropical gardening resources.

Readers – Do you know of any great books or websites that might help Cindy with her tropical, Central American garden or Marshall with his Florida garden? Please share in the comments.

Want to ask me a question?

It’s easy, and I’d love to feature your question in a future Q&A! Just follow these steps to make it easier for me to answer your question:

  1. Send me an email with “Question for Erica” in the subject line.
  2. Ask your question in one or two sentences.
  3. Start a new paragraph and provide any additional details that are relevant to your question.

PS – I have this nagging feeling that someone sent me a question and I responded, “I’ll answer it in the Feb Q&A” and I haven’t. If that’s you, I’m sorry! I can’t find the original email – can you please re-send your question?

Thank you!


Five Things Friday: 6/2/17

$
0
0

I have been in such a great mood this past week. I don’t know if it’s that we had those stretch of bright sunny days and I finally feel like my garden is somewhat back under control, or that school is nearly over, or what, but it’s been a great week!

This week’s randomness: how to justify chocolate chips for breakfast, a new favorite watering tool for the garden, the most adorable house-swap you’ll ever see, my everyday beverage carry, and why no one goes out for lunch anymore.

What I’m Eating: Chocolate Chip Yogurt

Yogurt Chocolate Chips

Ok, this is what you do. Take out a pint jar of homemade unsweetened yogurt. Scoop half of it into a bowl. Toss some chocolate chips in there. If you have mini chocolate chips that’s even better.

The yogurt is tart, but then you get these little bursts of chocolate-sweetness when you hit a chip. Perfection.

The next day: take out the now half-full pint jar of yogurt and toss your chocolate chips right in the jar. No need to make a bowl dirty.

Now you’ve got an excuse to eat chocolate chips in the morning for the probiotic. You’re welcome.

2. Gardening Tool I’m Loving

Dramm watering wand

I helped my neighbor water her garden the other day (that’s her fresh and tidy garden in the photo, not mine), and got to try out her sweet watering wand. It was love at first sproodle! (I think I made that word up, and now it sounds dirty.)

It’s a Dramm 30-inch Rain Wand, and it was just a dream to use – smooth on/off action, fine, dispersed water pattern, and great reach. I liked it so much I ordered one for myself, for spot watering and keeping stuff in pots alive over the summer. It should be here soon! I’m very excited.

What I’m Watching: Amazing Hermit Crabs

No words will do this 5-minute long nature video justice. Just trust me – it has David Attenborough and hermit crabs playing Extreme Flip This House. Watch and be amazed.

What I’m Packing: Everyday Beverage Carry

EverydayBeverageCarry

This is how I roll when it’s gonna be a long, thirsty day out of the house. All this fits easily in my backpack (it’s a big backpack) with plenty of room left over for my laptop, various power cords, kids school books, pencils, wet wipes, and assorted other essential and educational things.

Left to right in the back:

Quart-sized mason jar topped with a reCAP flip lid.  That’s my water bottle. Goes everywhere with me.

Bonavita mini electric kettle. I looked everywhere for an electric kettle that was small enough to be genuinely portable. I tried an immersion water boiler first, but didn’t like it at all. It seemed like a child-scalding just waiting to happen. But I love this little kettle. You can see from the picture it’s about the size of a quart jar.

Stanley thermal coffee mug. I got this last year for camping with an REI dividend and immediately made it my everyday to-go coffee mug. Excellent quality (I’ve dropped it multiple times and it’s still perfectly leak proof), easy to drink from one-handed, and it keeps my coffee warm for several hours.

And in front, assorted tea and instant coffee. I love Throat Coat and just about everything from Traditional Medicinals. Instant coffee is bullshit, but I pack Starbucks Via which is slightly less bullshit than most, better than stale percolator coffee, and comes in very convenient single-serving tubes.

When it’s time for a tea or a coffee and I’m at the kid’s school, or off somewhere on an outing, I hit up the water fountain to fill my thermal mug with water. Then I pour the water into my mini kettle, plug-in the kettle, wait about 3 minutes, and pour the steaming hot water from the kettle back into the thermal mug. I do it this way so I never heat up more water than my mug will hold.

Then, I just drop in a tea bag or a packet of the instant coffee, depending on my mood, seal up my thermal mug, and I’ve got a nice hot beverage for the next couple hours, when I’ll probably repeat the whole process. Cheaper, quicker and easier than finding a café.

What I’m Pondering: The High Cost Of Restaurant Food

I read an article in the Wall Street Journal the other day (it’s behind a pay wall, but if you are a subscriber or have google-fu you should be able to read it) called Going Out for Lunch Is a Dying Tradition.

Here’s the take-away. (Hah! Get it? Take-away. Lunch pun.)

In even high-powered, corporate settings, people are rejecting lunch out in favor of brown bagging it or getting food delivered into the office. A couple things are at work.

  1. Check the chart above. The cost of dining out has risen dramatically in the last several years, while the cost of ingredients from the store has been stagnant or even dropped, depending on what’s in your shopping cart. The financial spread between dining out and brown bagging lunch is very noticeable right now.
  2. Culturally, we have all decided we are far too busy to sit down for a midday meal. This is true even for highly paid “power lunch” types who aren’t as price sensitive as the average worker. The article mentions “lunch and learn” sessions –  because there’s no time to just lunch, you know.
  3. A lot more people are telecommuting. Homebrew Husband is one of these corporate, knowledge-worker types. He works from home about 80% of the time. No need to go out for lunch when your full home kitchen is right down the hall.

Have you changed your dining out habits for lunch – or any other meal – because of the increasing cost of restaurant food?

•          •          •

Ok, friends, that’s it for this week’s Five Things Friday. Hope your weekend is fab!

5 Things Friday

Build A Super Simple Tool Rack From A Pallet

$
0
0

It started when my son, the would-be builder, saw a couple of pallets at our neighbor’s house. They were propped up on the side of the road with a “free” sign stuck on. Have you ever seen a 6-year-old drag a full-size pallet for half-a-block? Adorable.

Our neighbor got wind of my son’s scrap-wood obsession and donated even more pallets to the cause. (He even brought them to our house – I have the best neighbors!) Soon, our driveway was practically paved with pallets.

Pallet Tool Storage8042

My son had plenty of opportunity to create with his pallets, but about the time I wrote this, I decided enough was enough and confiscated a few for my own use in the garden.

What I had in mind was a simple tool storage system. About five years ago, I used a pallet to screen one of those ugly, dumping ground storages zones on our property from view of the street. That pallet has held up remarkably well, and over time I started to just stick garden tools in it, where they sit happily, until I finally go weed the front garden.

I figured something similar out back would be a good space-saving way to store garden tools during active gardening season.

I started by hauling the two most attractive, solid-looking pallets around back, to the path area between my chicken run and the main garden (this photo collage should help get you oriented if you want).

Pallet Tool Storage8083

Because of the cross bracing in pallets, there are natural built-in dividers that nicely hold long-handled garden tools. I debating ripping down some 2×4 scrap to make more of these cross braces. If I had more skill with power tools, or owned a table saw, I probably would have. But as-built works fine.

Pallet Tool Storage8088

To level the pallets and to get them up off the ground where they would rot far more quickly, I set the pallets on a few cinderblocks. The pallets and cinderblocks were leveled very well. I took quite a while with this, doing it right, but since the fence behind the pallets isn’t level, there’s a bit of a wonky look when you step back. Oh well.

Pallet Tool Storage8095

I wanted to secure the pallets in a way that would not permanently affix them to the fence. The fence badly needs to be stained, and that’s on my list for this summer. So I wanted to be able to fairly easily remove the pallets and set them aside when paintin’ time rolls around.

Solution? Hammer in some metal U-Posts! (Like these.) Each pallet got one U-Post, and they were positioned so they pushed the pallets back against the fence as much as possible for added stability.

Pallet Tool Storage8097

It took a bit but I got the U-Posts level with the pallets eventually. The pallets were tightly wired to both the U-Posts and the fence behind.

Pallet Tool Storage8914

The next part was kinda a pain. I found whole and broken cinder blocks and big rocks, and filled in the gaps at the base, in-between the “real” cinderblocks that hold up the pallets

Pallet Tool Storage8102

Then I poured a bunch of 1-2″ drainage rock we had leftover from another project down the middle of the pallet, to fill to about half-way up the first “course” of wood. This improves drainage, so the tools won’t end up in a standing puddle if when we get late-spring rains. It also raises up the tools in the pallet so they sit a bit higher.

A bunch of rocks slumped down into the chicken-coop because there were some gaps in my foundation. That was a serious drag. Although I like the outcome of the drainage rock layer, it was tedious to do.

Pallet Tool Storage8921

A nice bright coat of paint and my pallet tool storage rack is done! I really like this simple tool storage solution!

Pallet Tool Storage8911

Thoughts, Ideas and Suggestions

If you have better woodworking skills than I do, additional divider sections would help more tools stay more perfectly upright.

Some hooks on the front for hand tools would work well.

Someone on social media asked (I think with mild horror) if I leave my tools outside. Yes, yes I do. I’m pretty good about getting the hand-tools I really rely on under shelter, but I leave my long-handled tools lying everywhere during active gardening season. It’s not deliberate neglect, it’s just that I sometimes hop from one thing to another faster than I should. If you take better care of your gardening tools then I do, this might not be a great solution for you.

However, my tool care failures are why I like this set-up, actually. It’s so space efficient that it tucked right in next to my main gardening area, which helps me keep my tools put away and contained, even if they are exposed to the elements.

I think you could do something like this inside a carport or storage shed for year-round tool storage, assuming the roof on your covered area was tall enough to let you lift the tools up and out. Although for tool storage inside, it’s hard to beat nails-in-studs.

Pin Me, Share Me, Save Me For Later

Pallet Tool Storage Pin


Latest Images